Separated Storyboards for Tab Bar Controllers
May 10, 2015While working on an iOS project, I encountered the realization that a massive storyboard was a bad idea.
It is simple and very easy to implement everything in one storyboard, but a large storyboard has many
drawbacks such as being slow to load, it is difficult to get a complete picture of what is going on, and
if you work with others it can be difficult to deal with version control. In this tutorial, I will
discuss how I separated out the main storyboard into multiple ones and how to get it to work specifically
with a TabBarController. At the end, I will discuss why I approached it the way I did and why I felt it
was a good way to do it, feel free to correct me or suggest other ways as I am still learning Swift and
iOS development!
Introduction
My sample application will cover using the TabBarController in the storyboard mode and separating out
each tab into its own storyboard. This allows for:
- Modular sections.
- Faster to load storyboards.
- Smaller storyboards that are thus easier to understand.
- Easier to collaborate with version control.
Disclaimer
I am still learning Swift and iOS development, I do not consider myself an expert and would actually still consider myself a beginner, but I want to share what I've learned and worked out so far to help others!
Setting Up
To set up, create an iOS application as follows:
- Create a new single page application for iOS.
- Make sure to be using Swift as the language.
- You can leave Core Data unchecked as we do not need it.
Remove Default View Controller
- Remove the default
ViewController.swiftfile and "Remove Reference" when asked. - In the
Main.storyboardyou can select the view controller that's present and delete it. We'll set up a newTabBarControllerinstead.
Step 1: Add the Tab Bar Controller
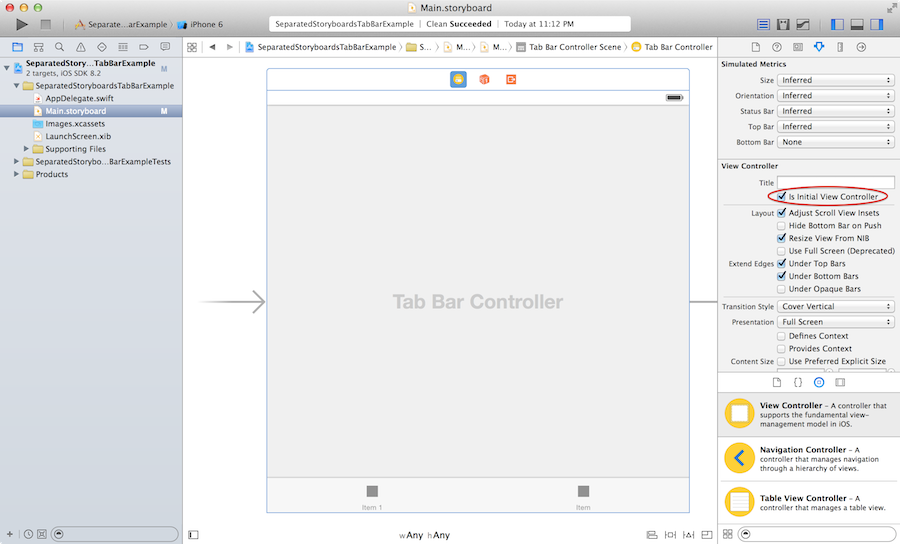
- Drag the Tab View Controller from the Utilities bar into the
Main.storyboard. - Click on the Tab View Controller and in the Attributes inspector, check the "Is Initial View Controller". XCode will thus know what to load when the application loads.
Step 2: Add the View Controller in Storyboard
XCode is nice that the default Tab Bar Controller provides 2 tabs with UIViewControllers. However, just
to be sure, I will step through adding a new tab on the storyboard and setting up the separate storyboard:
- The first step is to drag a View Controller from the Utilities bar into the
Main.storyboard.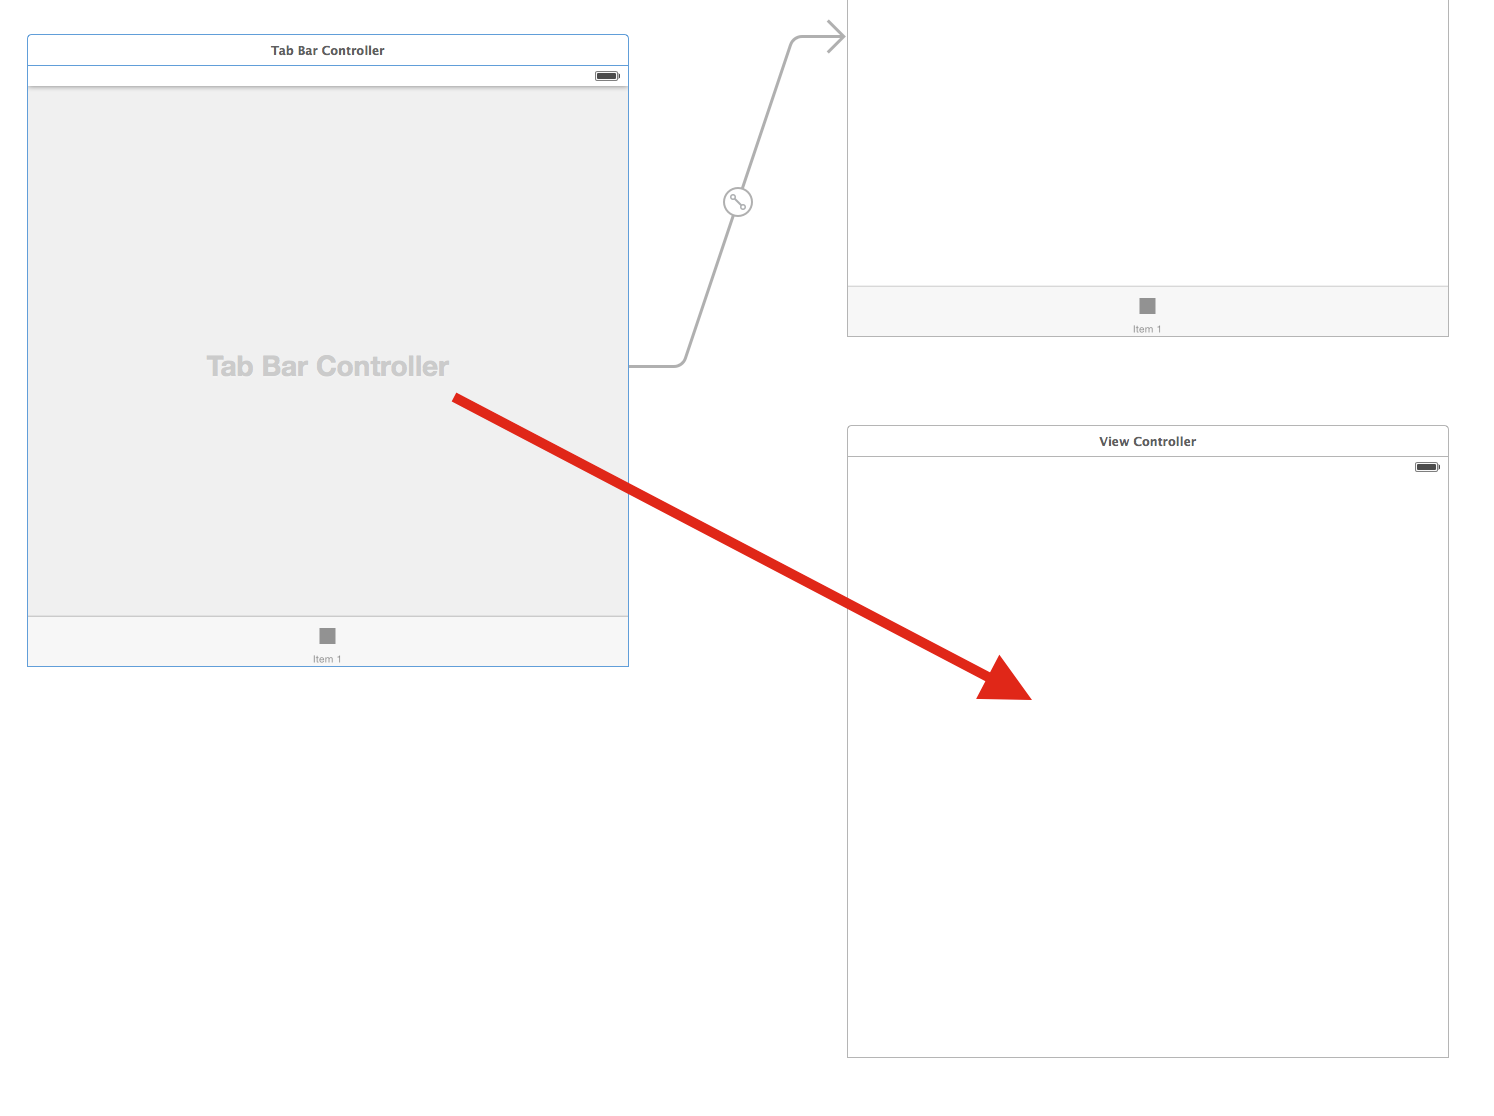
- Control drag from the Tab Bar Controller to the View Controller and under "Relationship Segue" select
"view controllers".
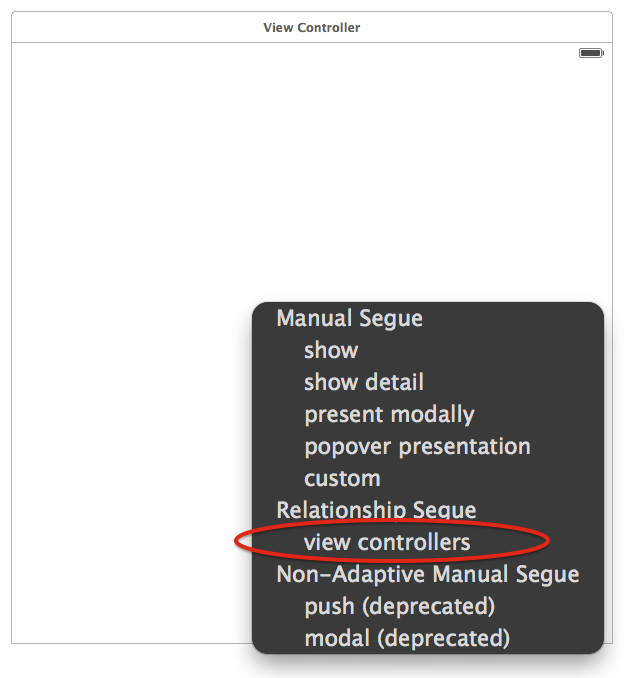
This sets up the view controller so that it works with the TabBarController. You can then modify it as
you see fit for the tab icon and names.
Step 3: Create the UIViewController
- We're now going to start creating the separated section for the tab. We'll create a New Group in our
project called
First. This will be to just be modular and keep all our files associated with the "First" section such as the storyboard and the view controller to help set up using this separate storyboard. - Then create a new file and choose
iOS > Source > Cocoa Touch Classand we'll name itFirstTabViewControllerand make sure it subclassesUIViewControllerand is a Swift file.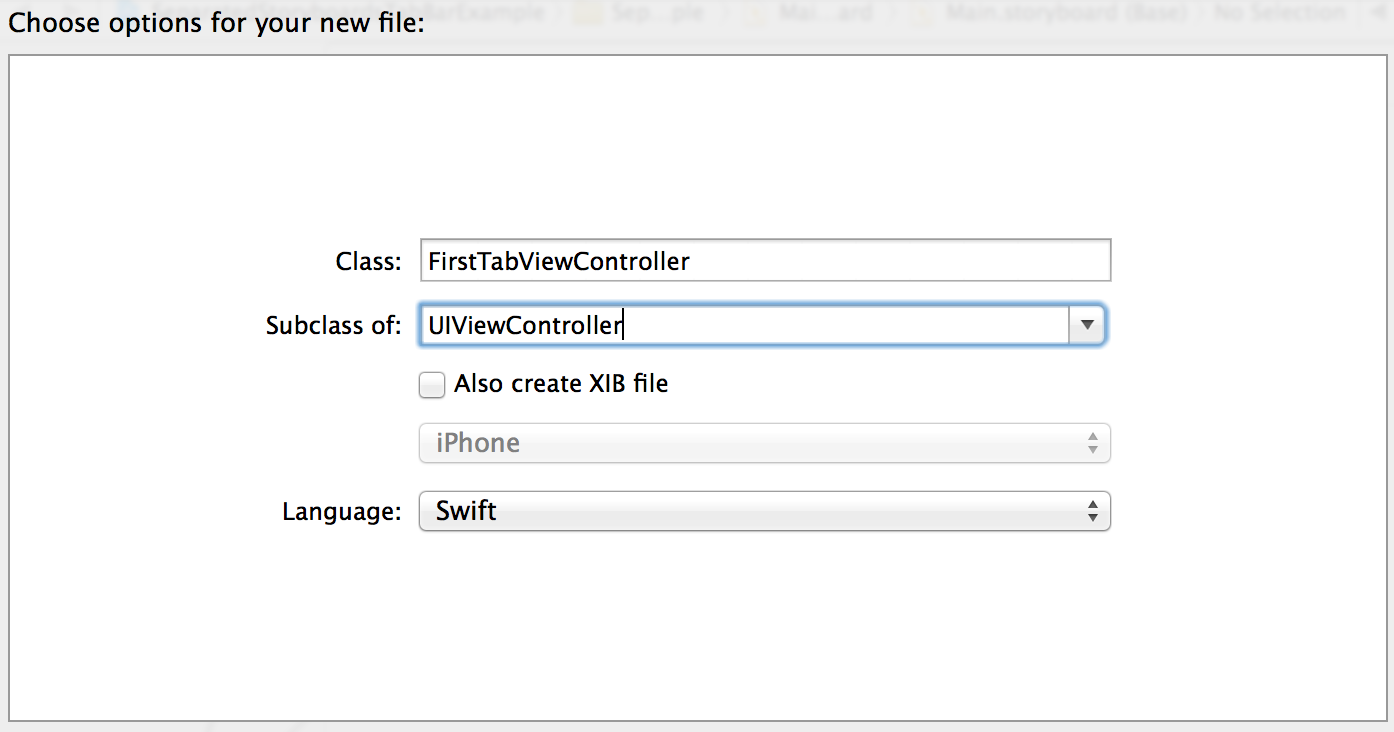
- This will now be the file we use to connect the two storyboards together! in
Main.storyboardselect the first view controller for the first tab and in the Identity tab set the class toFirstTabViewController.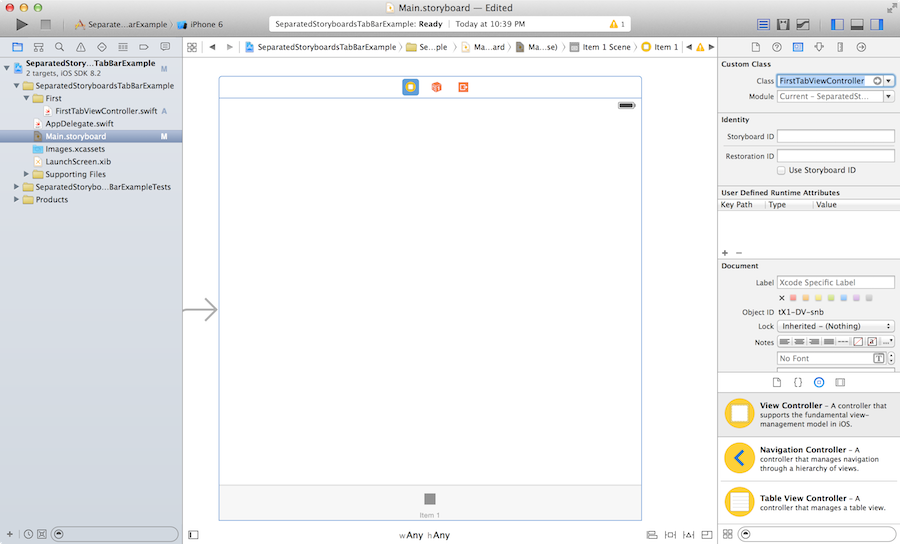
Step 4: Create the New Storyboard
- Now we can set up the new storyboard for our "First" section or tab. Create a new file and choose
iOS > User Interface > Storyboardand save asFirstwhich will save asFirst.storyboard. - This will now be the storyboard that we add all our views for the "First" section or tab. In this example, I will add a simple view controller and set the background to blue.
- Make sure to set your entrance point to "Is Initial View Controller". If you forget to do this, then
you will get an error on initializing the storyboard.
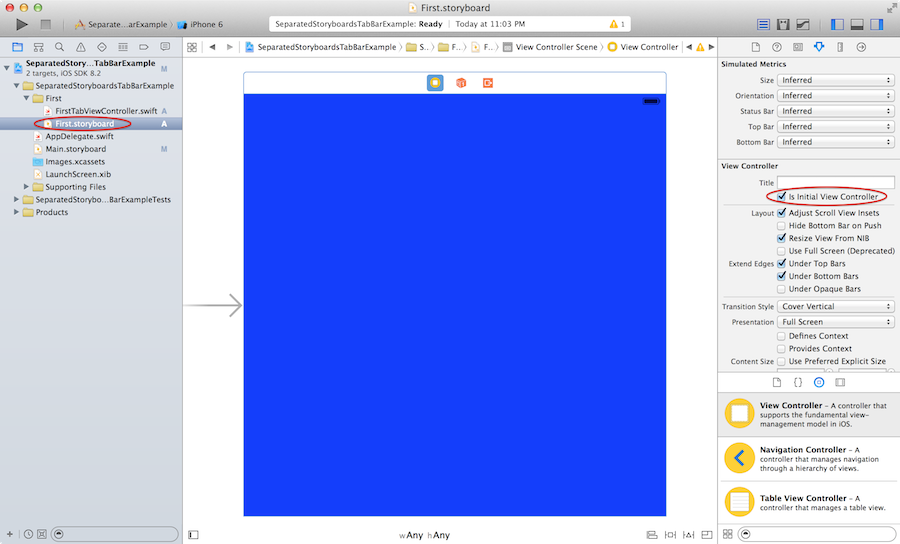
- Finally, to use the separate storyboard we will now add code to
viewDidLoadinFirstTabViewController.swift:
import UIKit

class FirstTabViewController: UIViewController {

    override func viewDidLoad() {
        super.viewDidLoad()

        // Do any additional setup after loading the view.
        // Instantiate the separate storyboard for First section and load it
        var storyboard = UIStoryboard(name: "First", bundle: nil)
        var controller = storyboard.instantiateInitialViewController() as! UIViewController
        addChildViewController(controller)
        view.addSubview(controller.view)
        controller.didMoveToParentViewController(self)
    }

    override func didReceiveMemoryWarning() {
        super.didReceiveMemoryWarning()
        // Dispose of any resources that can be recreated.
    }

    /*
    // MARK: - Navigation

    // In a storyboard-based application, you will often want to do a little preparation before navigation
    override func prepareForSegue(segue: UIStoryboardSegue, sender: AnyObject?) {
        // Get the new view controller using segue.destinationViewController.
        // Pass the selected object to the new view controller.
    }
    */

}
The most important lines are:
var storyboard = UIStoryboard(name: "First", bundle: nil)
var controller = storyboard.instantiateInitialViewController() as! UIViewController
addChildViewController(controller)
view.addSubview(controller.view)
controller.didMoveToParentViewController(self)
These are the 5 lines of code that you'll use when wanting to use a separate storyboard and load it into your tab.
Note: In newer versions of XCode 8.3+ you will be required to have
as!instead of justasfor the casting. The project I push to Github (at end) is for XCode 8.2 which uses the olderasversion without the exclamation.
Step 5: Rinse, Lather, and Repeat
From here you now know how to add a new separate storyboard for each tab. All you have to do is add a new
Storyboard and View Controller which I generally call TabViewController prefaced with some name to
describe the section. This TabViewController will help link your main storyboard to the separate storyboard!
I've gone ahead and repeated this for the second controller as well and set that background to green.
Note: You can actually create your own parent class of
TabViewControllerto house all the logic of loading the storyboard and adding the new storyboard as a child of theTabBarControllerand thus simplify the coding! I did not do this in the example to allow you to see the code in action.
You can see the example project on my Github by clicking here! Let me know if you have any questions and good luck! Below you can see the final product in a GIF format:

Why This Way?
I'm not sure if it is necessary to discuss what happened in this tutorial but I thought I'd bring a
bit of my thoughts into the post. In the beginning, a partner and I were working on a project which
had 5 tabs and we had all the UI in the Main.storyboard. This file took a bit to load and whenever
we both modified some UI elements, we had to worry about merges which are not easy. Thus I set out
to actually figure out how to separate out the storyboards so that we could have a more modular
project.
My first instinct was to just try to programmatically add the Tab Bar Controller, but then I thought
this would be too much work because we already had things started. I still think it's nice to have
the storyboard with the TabBarController because it allows us to add segues or at least get a
visual feel of the application we are designing rather than having it all in code.
It seemed only logically that I needed to attach a view controller in Main.storyboard in order to
get the proper tab nesting with the TabBarController. If I did not have this, I could easily program
for example buttons or programmed segues to load the storyboards instead; however, I think that
this tutorial universally helps understand using separate storyboards due to the extra steps needed
to work with the TabBarController.
I do still wonder if this is the correct way to do it, so let me know if there is a better way or if you have a different way and want to discuss the differences or pros/cons! Thanks and hope you enjoyed this tutorial!
comments powered by Disqus
